TECH CORNER
Beetle Shift Rod Bushing
Replacement
“Where’s that gear” By: Glenn Ring
I recently had a Berg 5 transmission built.
After installing it I noticed that the gear location was difficult. Sometimes when downshifting from 3rd
into 2nd, it would try to engage reverse causing a rather loud
grinding noise (not good thing). I spoke to Gary Berg (he built the tranny) and
he told to that the shift rod bushing is probably the cause. It must be in
perfect condition and properly lubricated for precise shifting. He also said that the support bracket could
be damaged and might need to be replaced.
I
decided to tackle the problem right away and not risk the chance of damaging
the new transmission. I purchased the following parts, 111-701-225B Shift
Guide, 111-701-259A Bushing, 111-701-263 Clip for bushing and 311-798-211 Shift
Rod Coupler.
To
replace the bushing the shift rod needs to be removed. It’s moved toward the
front until the end clears the bushing support. There is an inspection plate on
the frame head that must be removed. It’s held on with 2 10mm bolts. Then you remove
the 2 13mm bolts that hold down the shifter. At that point I was able to reach
in a check the play I in the shift rod. To my surprise there was way too much,
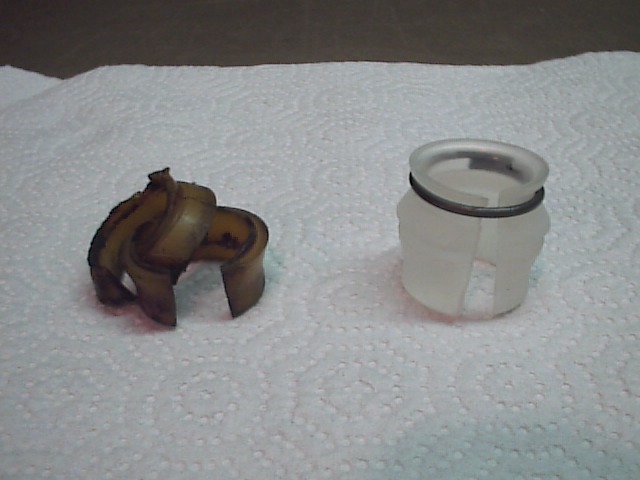
in fact after a closer inspection I found that the bushing wasn’t worn out, but
was missing and broken in 3 pieces. Next I removed the rear seat bottom to get
access to the shift rod coupler. You will need a Philips screwdriver to remove
the cover plate. Then use a 8mm wrench and needle nose pliers to remove the lag
bolt that hold the shift rod to the coupler. Finally you need a 8mm open-end
wrench to remove the square setscrew that holds the coupler to the
transmission.
Now
comes the fun part. You need to push the shift rod toward the front until it
clears the bushing support. I used long needle nose pliers that are bent 45
degrees to gently move it. When you get
about 3” from the back end of the rod, the front end had to be passed through
the inspection hole in the frame head. You need to go to the front and reach in
and lift it through. It’s real tight and not that easy. I use a bent wire
hanger to help grab it. I also use another wire hanger to support the back end
of the rod once it came off the bushing support. Otherwise it will drop into
the tunnel.
If
your old bushing is there, you need to reach in and remove it. The support is
about 1.5” past the shifter opening. It’s real tight so take your time. Take a
few seconds to inspect the bushing support. If it is damaged, then it needs to
be replaced (a major pain and not covered here). You are now ready to install
the new bushing. Make sure the clip is in place and carefully push it into the
support. The bushing has a grove and makes a positive snap when it’s in place.
Check the fit to make sure the support isn’t damaged. There’s a cut in the bushing,
it should be rotated to face the driver’s side. Apply some grease to the
bushing and push the shift rod back into it. Use the needle nose pliers to
carefully slide the rod back. Apply some grease, with a small acid brush, every
few inches. When the rod is almost in place you can go to the coupler opening
in the back and pull it the last few inches. Now just install the new coupler.
Make sure the square setscrew is correctly in place and use a safety wire to
ensure it doesn’t come loose. Finally reinstall the shifter and the inspection
plate in the frame head and you’re done.
After you’ve
cleaned up you are ready for many years of smooth shifting. No more searching
for gears. This is one of those things you do every 20 years. Hopefully, you’ll
have the car 20 years from now to do it again.